My friend Tamara lives in Lazio, north of Rome, below the Monti di Cimini range which is full of hazelnut trees. We chat most weeks – she to improve her English, and me to improve my Italian (she is better and more confident than me). Perhaps, inevitably, we often talk about food – and she shares some of the very very localised versions of recipes specific to the area, m and even to her village.
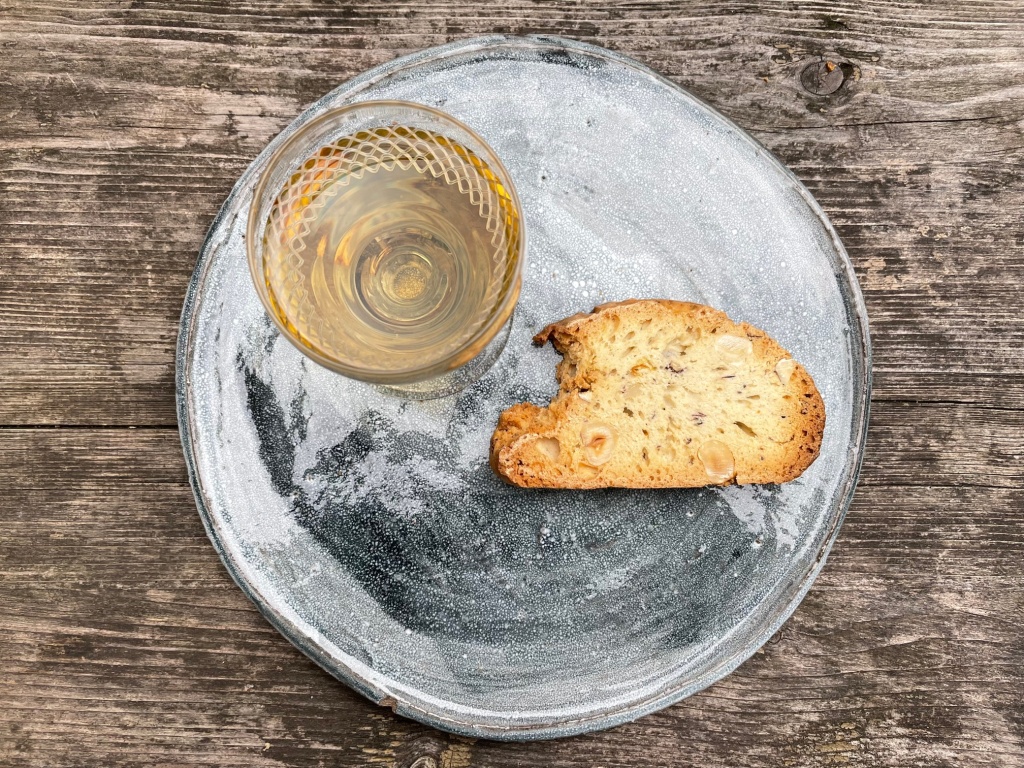
Tozzetti is the name used in Lazio and Umbria for the twice baked (biscotto) biscuits that elsewhere in Italy are known as Cantucci (although Artusi calls them biscotti croccanti, or crunchy cookies). The recipes are all similar; flour, sugar, eggs, nuts, usually almonds, sometimes aniseed, sometimes candied fruit – you bake the loaf, allow to cool, and then slice and rebake, to completely dry the biscuits out, so they’ll keep for ever, ready to be dipped in Vin Santo, and enjoyed.
See here, then is Tamara’s recipe, specific to the region of Tuscia, within Lazio. It is the same, but different from other twice cooked biscotti recipes, the aniseed liqueur, yeast (which I’ve never seen before) and the thing that truly sets it apart, is the use of the Monti di Cimini hazelnuts, instead of almonds.
Ingredients
100ml of extra virgin olive oil
400 g of hazelnuts
4 eggs
800 g 00 flour
400 g caster sugar
200 ml milk
7g fast action yeast
10 tablespoons of Mistrà. (This is an Italian aniseed liqueur, I substituted Pastis, which is easier to come by)
Zest of 1 lemon
1 teaspoon of baking soda. (replace with Baking Ammonia if you can find it)
Method:
First toast the hazelnuts in the oven until they begin to brown, then rub them in a dry tea bowl to remove most of the brown skins
Beat the eggs and the sugar to a cream
Add the rest of the ingredients, except the hazelnuts, then the sifted flour with baking soda or ammonia.
Finally add the hazelnuts and mix well.
Form the dough into two rough loaves and place on a baking tray covered with greaseproof paper and bake in a preheated oven at 180 °/Gas mark 6 until they are just golden.
Remove from the oven and wait for them to cool (ideally overnight), this is because otherwise they could crumble.
Once cooled, cut them crosswise, into slices of about 1cm thick (if the dough is still warm, the slices will crumble).
Put them back in the oven at 150 °/Gas Mark 2 to let them brown a little ( you’ll need to turn the slices to brown booth sides) . As soon as they are down, switch off the heat, but leave them in the oven, to cool, with the door ajar.
Stored in an airtight container, these will keep for two to three weeks, but if they go soft, just reheat them in the oven, to dry them out again.
Most of the Sicilian food that I cook and write about here is essentially Palermitan, or is ubiquitous to the whole of Sicily, and so is close to generic as you get on that often fractious island. I hardly know the east of Sicily – just from overnight stays as a tourist, sights out of hire car windows, a port to catch a ferry from. And Messina, at the furthest east, almost touching mainland Italy, I have never visited at all.
My only connection with that part of Sicily is via my friend Vincenzo, who somehow has a better English accent than most British people I know, and who allows me to practice my stumbling Italian on him in exchange for food.
This Christmas just gone, with no-one going anywhere, especially not back to Messina, Vincenzo was due to miss only his second Christmas with his family since he moved to the UK, 14 years ago. Whilst stoical, there was one aspect of those family reunions whose absence would be most keenly felt; the Christmas Eve pituni ritual! A gathering of all the women from the extended family, to assemble piles of savoury, deep fried semi circles of stuffed dough. Favourite fillings demanded, dreaded anchovies to be excluded in Vincenzo’s case.
‘Could I make him pituni?’
As you may have twigged, I like a challenge – so I said ‘sure’, knowing full well that scarole, the right cheese, even decent tomatoes, would be a tough find in Birmingham, in December. ‘Leave it with me’, I breezily replied, confident that in one of my 1.5 metres of Italian recipe books, there would be plenty written about such a strongly treasured part of Messina’s food culture.
Well how misplaced was that confidence? Nothing in Coria, nothing in Boni, not so much as whisper in Hazan. Artusi was silent, the nuns characteristically tight lipped. I found just one recipe, in the Mary Taylor Simeti’s incomparable Sicilian Food. I love this book, it’s definitely worth buying if you’re interested in Sicilian culture and food, but the recipes don’t always work out for me (the Chancellor’s Buttocks were far too lardy for my sometime vegetarian tastes), so I turned to the internet for additional advice.
As with imagined ailments, so with food you’re not sure of: never look on the Internet. My God! To say that people hold strong opinions on the subject of Pituni is like saying that Donald Trump’s hands are slightly on the small side. Anyone writing about food who is from Messina, or who has visited Messina, or has a relative from Messina, has the definitive recipe for what I thought was a ‘just’ street food. It must only be bought from this cafe, the dough must never contain yeast, the dough must always contain yeast. Include wine, don’t include wine. Without anchovies, it is inedible. But most importantly, ALL other versions are wrong.
I’m used to Italians forcefully expressing their opinions on food, but this was really taking the pituni. Keeping my northern European head down, I retreated to rethink my strategies.
My thoughts were that if Simeti, (an American who had almost accidentally landed in the midst of a Sicilian family) gave a recipe, she would have had it verified; the opprobrium that meets a misjudged recipe in Sicily can be too a strong risk to take.
Secondly I consulted Vincenzo, what did he actually want in them? ‘Oh you know, some cheese, some ham, some greens’.
‘So, it doesn’t have to be scarole’
‘Hmm, no’
“Or the proper cheese?’
‘Nooo! Any cheese – but you can use the cheese my mum sent, that’s what we use, Galbanino, I’ll bring some. BUT NO ANCHOVIES’
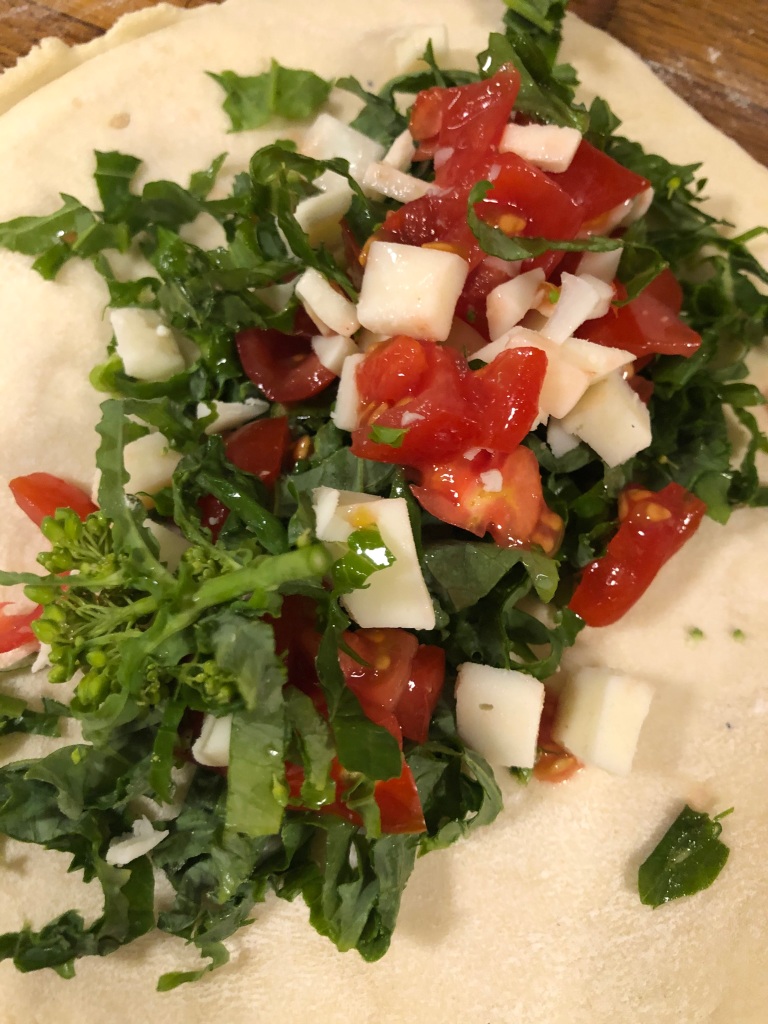
So, I made yeasty dough, as does Simeti, using semola rather than 00 flour, and substituted cime di rapa for failed Scarole, the cheese was not ‘authentic’ but it was completely true to one family’s tradition, chopped tomatoes and oodles of black pepper. We used a side plate to to make our circles, filled them, folded them, sealed them, and plunged them into hot, hot oil.
This is fun; dangerous, sometimes volcanic if the filling leaks out. The dough bubbles, the pituni are so buoyant they have to be held down, like the Duke of Clarence in his barrel of Malmsey.
Frying them individually, one assembling whilst the other watched the ferocious roiling oil, became exciting, raucous and entertaining; mixing up fillings, burning fingers and mouths as we were too impatient to let fresh pituni cool, eager to try the next combination and savour the sweet, bitter, crisp, melting combination.
They were delicious – the greens ever so slightly bitter, cheese sweet and stringy, tomatoes steamed from within. This was one of the most sociable things, one of the most enjoyable things I had ever cooked. I get why it is such an important tradition to Vincenzo’s family – scale it up to cousins, aunts, uncles, nieces and nephews, grandparents. It must be an impressive, vocal, wonderful cacophony.
So, the recipe, that I made, that is in no way the definitive recipe, but is now my recipe. It is not the pituni you can buy in Messina, I’m sure, or the one Vincenzo’s family celebrate Christmas Eve with. It is probably not close to Simeti’s version, and I know that there are some that would refuse to even allow me to call it pituni. But, it is pituni in spirit – because it brought people together, talking, eating, laughing and cooking. And in that sense, it is the perfect recipe.
For the dough
1 teaspoon dried yeast
280 ml of lukewarm water
500g semola flour
1 teaspoon salt
2 tablespoons of olive oil.
Dissolve the yeast in the water, and leave somewhere warm until a foam floats on the surface
Add all the other ingredients into bowl, and gradually add the water – you may not need it all.
I mix and knead the dough in my food mixer, using the dough hook for ten minutes.
Once the doughs smooth, stretchy and soft, put it into an oiled plastic bag and put it in the fridge overnight. This slow rising and pricing makes for a more flavoursome final dough.
The next day, take the dough out of the fridge, and let it come up to room temperature a few hours before you’re ready to start cooking.
For the Filling
(You can use your own imagination here; Simeti suggests anchovies, scarole and Tuma or primo sale cheese, but also an onion and caper filling, which didn’t work for me).
A good sized bunch of Cime di Rapa chopped roughly.
Diced cheese (we used Italian Galbanino – which is bland and sweet, but melts beautifully into pure white stringiness – the closest I could think to describe it, it Babybel)
Tomatoes; skinned, deseeded and chopped.
A lot, I mean, an awful lot, of freshly ground black pepper.
Vegetable oil for deep frying.
When you’re ready to cook, you’ll need at least two pairs of hands; one to assemble and one to cook.
Take some of the dough and roll it out as thin as you can (2-3mm). As this has been proving, the dough will be stretchy and springy and resist being told told what to do, but persevere. Too thick, and you’ll have raw dough on the inside.
Take a side plate as a template and cut a disc out of your rolled dough, placing a mix of the cheese, tomatoes and greens on one half (leaving a gap around the edge to allow you to seal the pituni.
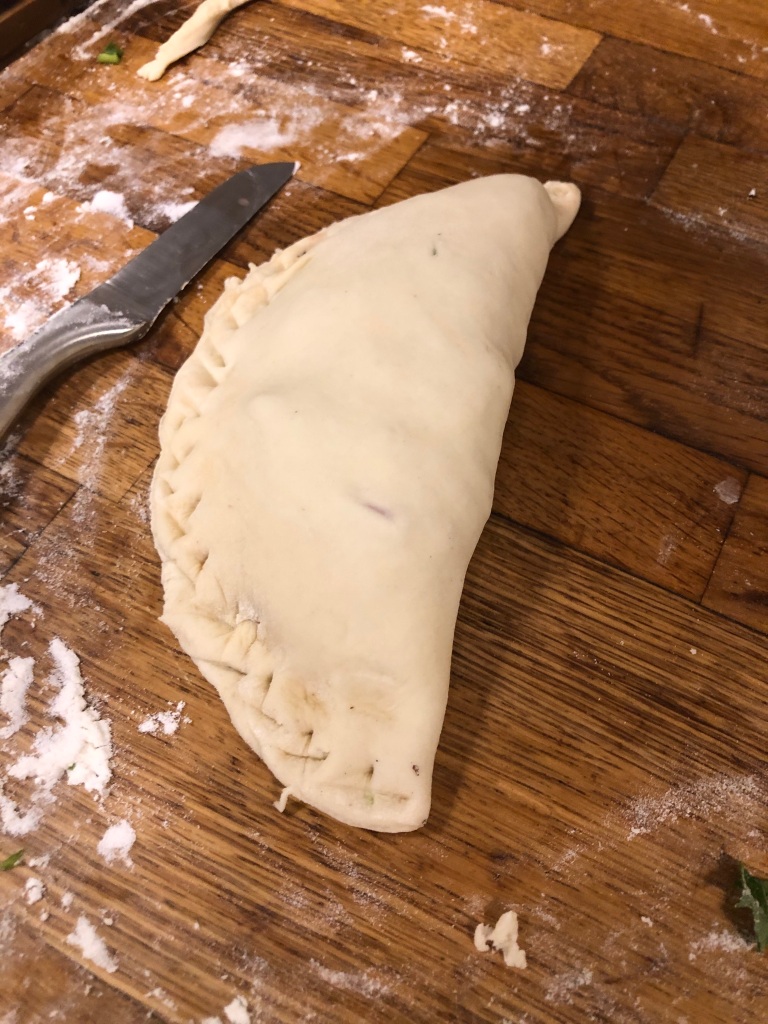
Wet all round the edge with water, then fold in half and with your fingers, press the dough edges together to get a tight seal. If the pituni are not properly sealed, the steam and liquid from the filling will react explosively with the hot oil.
Have your oil heating, and doors and windows flung wide, and when the temperature has reached 190 degrees centigrade, add your first half moon. If you don’t have a thermometer, take a tiny ball of dough and drop it into to oil, if it fizzes and floats, the oil is hot enough.
Frying needs constant attention, the pituni balloon up as they expand, so will float on the surface of the hot oil; don’t be afraid to dunk them to ensure they’re fully cooked. When one side is golden brown, flip them over and repeat.
Drain onto kitchen paper, and continue with the next one.
Now, these are best eaten just at the moment when they’re still almost too hot to touch – but you can let them cool, and reheat them in the oven, if you want to be more formal, and less sociable in your consumption.
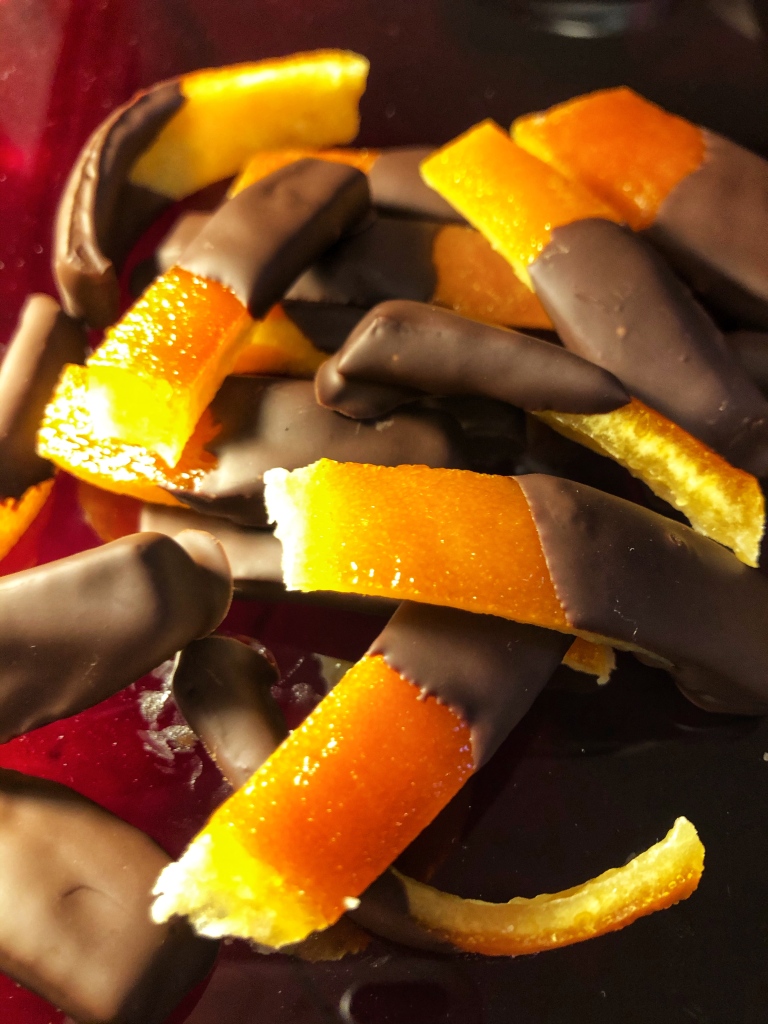
I first made these four or five years ago now – I can’t exactly remember when. What I do remember is that I was trying to do it blind, my recipe had no image of the end product, and being all fingers and thumbs and an impatient bull in a china shop, my scorzette (literally, ‘peel’, plural) ended up torn and ragged. They resembled more the peelings of a Christmas satsuma than a refined treat of sweetness and bitterness. I love them, they are such an intense hit of orange and chocolate – they’re a Terry’s Chocolate Orange, distilled and perfected.
Unlike the process for candying whole fruit, or thick pithed varieties like citron or pomelo, this technique is relatively quick in terms of actual cooking – the lengthy bit is the drying before you bathe your peel in chocolate. A small bag of these makes a great gift; once dry, they keep indefinitely, although they tend not to hang around for long. They might be a bit too mouth-puckering for sweet toothed children, which just means more for you!
Of course, you don’t need to dip them in chocolate, you can use the candied peel in your Christmas cake, or to decorate cannoli.
Scorzette di arancia al cioccolato
Candied orange peel dipped in chocolate
Thick skinned oranges (grapefruit works just as well)
Water
Sugar
Dark chocolate
Wash the fruit, and then cut the top and bottom off.
Then, with a sharp knife, slice four or five vertical cuts through the skin and pith, from the top to the bottom (try not to cut too deeply into the flesh, as this makes it harder to peel). Space the cuts roughly evenly around the fruit.
Then, carefully, and getting as much as the pith as possible, peel the segments off the fruit.
I slide my thumbnail into the thickest part of the pith and then tease it away. Try not to tear them, but if you do, it’s not the end of the world.
Put the sections of peel in a pan of cold water, cover, and bring this to the boil.
Drain, and then repeat this another two times.
This process reduces the bitterness of the peel.
Now make a 50:50 mix of water and granulated sugar. Bring to the boil, and when all the sugar is dissolved, add the peel. The amount you’ll need here depends entirely on how many fruit you’ve skinned, but they need to be covered for the whole cooking period, and the syrup will reduce by 50-60%.
Leave the peel to simmer until the syrup has reduced (which can take up to 40 minutes), and the thick white pith has become translucent, telling you that the sugar has penetrated all the way in.
Remove the peel from the syrup, and cut it into strips about 1cm wide, then spread these out on rack to dry (put a piece of baking parchment underneath to catch any drips).
Depending on the temperature, humidity and thickness of the pith, this can take a few days.
Once they’re dry to the touch, break some dark chocolate into a bowl, and place this over a saucepan of simmering water (don’t let the bowl touch the water). When it is melted, take your dry strips of candied peel and dip about half to two thirds of each one in the chocolate, and put them on baking parchment while the chocolate sets.
Then store them in something airtight somewhere cool and dry (not the fridge though, as this will make the chocolate discolour).
The fruit can be used for juice, or cut out segments for a fruit salad.
So many food likes and dislikes can be traced back to childhood encounters, experiences that fix an immoveable opinion. The lottery of school dinners in the 70s was the arena where I learnt to be faddy about what I ate, approaching meal times with suspicion and trepidation. I can remember a particularly vivid nightmare, where I was served up a stew of slugs – even today I can viscerally recall the muscular sliminess that I tasted, jolting me awake.
Puddings were where the high stakes games were played – there was so much that could go right, or go awry. A glorious day would be chocolate cracknel (I think just cornflakes and chocolate balled up by a ice cream scoop), with mint custard; conversely the mood could sink to untold lows if it was creme caramel, anaemic wobbling rubber in a pool of brown tears. Its sweetness could not hide its mediocrity. It was the taste of disappointment.
As an adult, as a cook, I have never overcome my childish impressions of creme caramel – never been tempted to revisit, retaste and potentially unlearn my prejudice. However, today, in a surprising development, I have segued in its general direction, almost by mistake. But first you have to put everything I’ve said so far, out of your head. Instead think of almonds; amaretti and amaretto, think fresh caramel and chocolate. Think patience and sensuality.
This is Bonet, a pudding of the Piemonte, in the north of Italy. It’s easy to make, although requires precision (not one of my main attributes, but with guidance, I pulled it off).
How I discovered this wonderful, silken thing is in itself a result of new experiences and changes to life brought about by the lockdown across the world. Exactly a year ago today – 16 November 2019, I was in Rome to learn about artichokes with Rachel Roddy and Carla Tomesi at the Latteria studio. It was a wonderful weekend of food, storms and art – which I wrote about here. I’d never met Carla before and was bowled over by her knowledge, humour and the way she made everything look so effortless, but was so keen to pass on everything she knew.
Come the new year, the lockdowns that rolled across the world and the explosion of Zoom, Carla came up with idea of having an occasional catch up, anyone was welcome – to talk about food, what we were cooking, which ingredients we couldn’t get hold of. And over the months, Carla’s chit chats have grown, people dropping in and out from across the world and across timezones. On these Sunday afternoons (or mornings for some of us), strangers from Italy, France, the UK, Canada, America, Mexico and more, sit for an hour, often longer, and become friends. There are regular faces, reunions, people ‘meeting’ for the first time after months of Instagram messaging – it is one of the positive things in the year that I have valued the most.
Often, Carla will send out a recipe beforehand, so those who want to, can cook along with her – learning new techniques and flavours. There is a lovely companionship to be had, knowing that we are simultaneously preparing the same dish in numerous countries and across thousands of miles.
And this then is how I came to discover and make Bonet, overturning my dread of wobble on the anniversary of the day that I met and began learning from Carla.
Bonet
For the caramel
200g caster sugar
6 tablespoons of water
For the custard
1 litre full fat mill
25 amaretti biscuits crushed.
5 medium eggs
5 tablespoons unsweetened cocoa powder
4 tablespoons caster sugar
Ameretto liqueur
You can either make individual puddings in ramekins, or one large one a 20cm pie dish.
Set the oven at 160 C or Gas mark 3
The caramel
Make your caramel by putting the water and sugar in a pan on a low heat. Without stirring, until it starts to colour, allow it to simmer and then melt. It can easily burn, so watch carefully, you’re aiming for something the colour of a ginger nut.
When it’s ready, use the caramel to line your pie dish, or ramekins.
It’s very hot, but will set quickly, so work fast but carefully – wearing gloves if you’re nervous.
Roll the dish around (like you’re sieving for gold), and the caramel will coat the sides as you tip it, setting into a solid, glassy finish.
You can do this bit in advance, which has the added advantage that, as the caramel cools – it starts to crack like breaking ice, which is both exciting, and strangely beautiful.
The custard
I assembled everything in bowls beforehand, which made everything very simple, and meant I could work quickly.
Start by heating the milk and sugar, and whilst this is happening, beat your eggs.
While whisking, pour the boiling milk over the eggs, and keep whisking til they’re well mixed.
Now sieve this mixture (which will remove any bits of egg white that didn’t get beaten in).
Pour the sieved mixture over the crushed amaretti (I blitzed them in the blender to get a fine powder) and leave to soak for five minutes.
Resieve the mixture, to remove any larger bits of biscuit.
Now into the sieved cocoa powder add a couple of tablespoons of the mixture, stirring together to form a paste, and getting rid of any lumps. Then add the rest of the mixture and stir thoroughly. One final sieve will remove any stubborn lumps of cocoa powder.
Fill your pie dish or ramekins and place them in a water bath in the oven. (A deep roasting tin is ideal), fill the water to just over half way up the side of the pudding dish.
Check after 20 mins for individual puddings, 40 mins if you’re making a large one. It is ready when you have a set wobble – my oven is always cooler than it says it is, so mine took over an hour to set.
Ideally, you make this the day before, so once it’s done, allow it to cool, and then refrigerate.
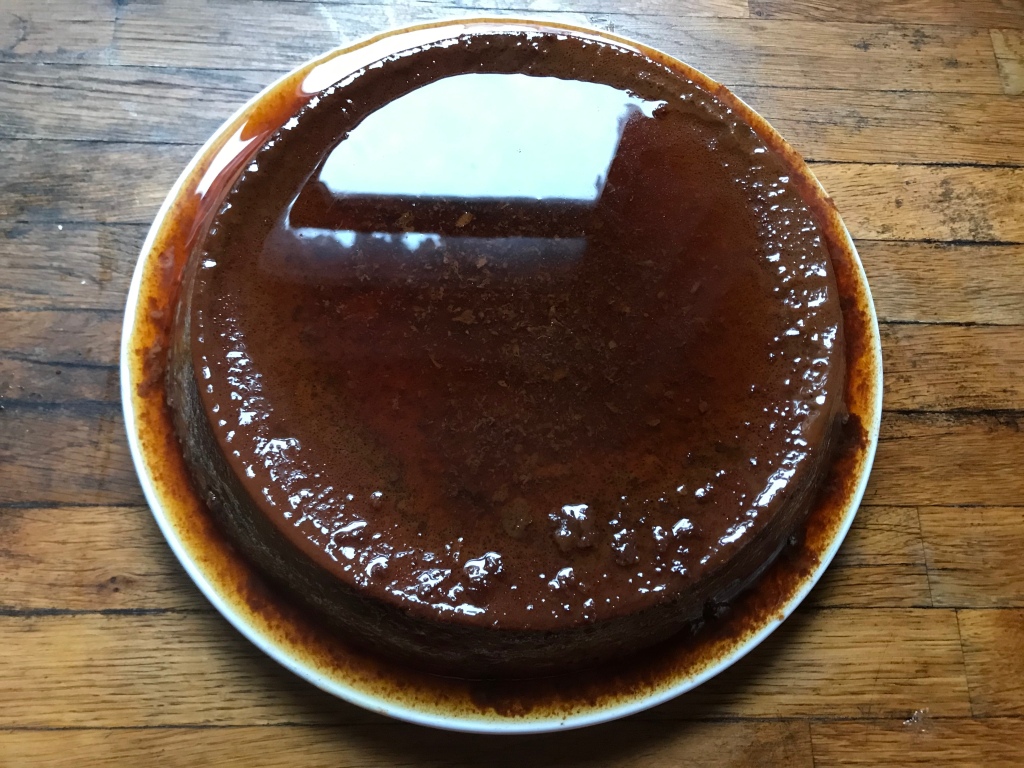
Serve by placing your plate over the dish and flipping them over quickly – revealing your triumphantly glazed, milky decadent Bonet, luxuriating in its own bath of delicious caramel.
As you can see from the photo – I need a bigger plate!
I have been meaning to make vincotto for a while – but the essential ingredient (grape must – the juice of freshly crushed grapes, destined to be fermented into wine) is hard to come by in Birmingham. And I wasn’t going to buy all the grapes in the market, to make my own grape juice. Occasionally I do draw the line somewhere when it comes to experimental cooking. With a pedigree going back to the Romans, this is essence of grapes, caramelised, brown rather than purple and concentrated down to about a fifth of its original volume.
Anyway – a heads up from italianhomecooking that Waitrose now sell the good stuff; fresh merlot juice, by the litre, green lit my latest trip into the unknown.
I have a wonderfully eccentric book – La cucina dei monasteri, by Sebastian Papa from 1981. A little treasure chest of collected recipes from the convents of Southern Italy and Sicily. I’ve written before about these convents that preserved so many recipes that would probably have been lost. And this book is fantastic in that it gathers them together, ensuring their continuity. To be fair, often, they aren’t recipes, so much as recollections and descriptions, so you need to exercise both imagination and caution when trying things out. For me, it’s also a way of practicing my Italian (still as terrible as ever) as I have to translate the recipes before I can begin my experiments.
And so the ‘recipe’ for Vincotto, or Vino Cotto, as it’s named in the book. This concentrated syrup of grapes is a sweet preservation for use as an ingredient or topping in numerous ways – on meat, on ice cream, on cheese, straight from the bottle, illicitly. Italians get a bit dreamy eyed about their vincotto – I think it must trigger the memory button in their brains and transport them somewhere sweet, sticky and delicious.
The nuns of the convent attached to Sant’Andrea Apostolo all Vergini in Palermo (long gone, it was destroyed in the war) made their vin cotto rather more luxuriant that the standard method (which is just juice, reduced to syrup, by cooking). Their version adds dried fruit to increase the flavour (and although their method suggests leaving the fruit in the finished syrup, I hoiked mine out, as I’m planning on adding it to my Christmas mincemeat).
The syrup, kept in the fridge will (in theory) last for months. But its star qualities will give it a much shorter shelf life in this house I suspect.
Below is the translated recipe from Papa’s book. Replace the must with sweet grape juice if you don’t have access to a vineyard. The dried pear and peach are probably not essential if you can’t find them – but I tracked some down in my local deli. I used two litres of juice which gave me 300ml of vincotto – 10 litres is fine if you have an Italian sized family, or are going into the convent business.
Yes it takes two days; no I don’t know if the wood ash is really necessary (can anyone enlighten me on why this is included)? But, the end result is, as the book says “buonissimo”. Give it a go.
From La Cucina dei monasteri
“Boil 10 litres of must and be careful when it boils, because it boils over, like milk.
Remove from heat and let it cool. When it’s barely warm, almost cold, add two fists of ashes: and if the ashes were wood it would be much better.
After having mixed well, taste to see if the flavor is still tart, like unripe things, if so add another handful of ash. Cover it and let it rest in the same container overnight.
Ideally use a terracotta or enamelled iron pot. The next day filter and starts cooking again.
Chopped orange peel is sweetened and boiled in water. The first water is thrown away and replaced, keep cooking until the skins have lost their bitterness: it’ll take four changes of water. In the wine that has been boiling for more than an hour, these pieces of orange are addded with various quantities of dried fruit: pears, peaches, and apricots, but not plums because they are sour.
To see if the wine is cooked, pour a teaspoon on a plate and divide the drop of wine with your index finger. If the two parts remain separate, the wine is cooked, if they come together immediately, the wine asks for more cooking
Leave to cool and bottle together with the fruit. It’s really good.”
Last week it was in the 30s.Bournemouth beach was the scene of a national scandal.We were both in lockdown and not in lockdown.The frisson of something about to snap hung in the clammy air. Deluges and thunderstorms were promised, but never showed up.So I came to the rescue and wheeled out my sure fire, rain making, cloud busting box of tricks and made a granita.
Granita, which I wrote a different piece on last year, is painfully, indelibly linked to the sun and heat of Sicily in July.The month when only fools visit.It is served, melting before your eyes – an ice that is a drink, a breakfast.Fleeting.The brain freeze lasts longer than the thing itself.There is so much that I am missing about Sicily at the moment.But granita is the thing that makes me cry when I think of being there; I don’t know if it is the freeze shudder amid the heat, or the race to eat before you drink, or memories of piazzas and castles; rubbish and stale dog piss.Granita in the UK is not granita, for me.It is the same, but not.A granita needs the setting, the temperature, the Italian voices, to become itself.Here, even in the most authentic of venues, it is just flavoured ice, reminding me that I am not in Sicily.
But, I make it anyway.Because I am a sentimental fool.I live in hope of hot days and sticky nights.I remember a house on Alicudi and a theatre bar in Palermo.I never think to make it until the temperature rises, and then, once that whim has grabbed me, and the juice or the syrup is freezing and being forked to shards, the wind switches to the west, the clouds roll in, drizzle, usually settles for a week or so.The moment for a granita breakfast slips through my fingers.Again.
Last week was such a moment.And to make sure that I lost it, I went the whole hog and tinkered with two entirely Sicilian flavours, almond and jasmine; expensive and hard to source, this is a luxurious treat.But it doesn’t need to apologise for itself.
A jasmine syrup made with heated sugar water and fresh jasmine flowers, and an almond milk, from blanched and blitzed almonds soaked in water for 24 hours, with just a smidge of extra almond essence to compensate for the Californian blandness of the dried almonds.You freeze, fork over, creating crystals of pure white snow. Refreeze, refork – this is not a smooth sorbet, but something that, in its heartbeat of existence, should be gritty, like Sicily.
Done, your granita is ready.Imagine marzipan, crystallised and frozen.If you like marzipan, you will be in raptures over this.The jasmine perfumes it, raises the almond’s game.And it is gone.
Now imagine eating this in Piazza della vergogna in Palermo in 40 degrees.Feel free to have a little cry about not being there.
Almond and Jasmine Granita
The Jasmine syrup
For this you will need fresh white Jasmine flowers (the summer flowering, Jasmine officianalis, not the yellow, winter variety, which is poisonous).Some recipes say 50g, some say half a kilo.Frankly, half a kilo of jasmine flowers is a tall order in Birmingham, so I cut my cloth accordingly.
So, with as many flowers as you can muster, soak them over night in cold water, 750ml if you’ve somehow managed to find your half a kilo, considerably less if you live in Birmingham and have a small garden with a smaller jasmine plant.Meanwhile, make a sugar syrup by boiling 250 ml of water with 325g sugar until the sugar is dissolved (frozen things never taste as sweet as they do at room temperature).Again adjust the quantities according to the abundance of your jasmine.
In the morning, mix the cooled syrup and the strained jasmine water.
The Almond Milk
Most recipes you read will err towards a conservative amount of almonds – I up the anti – because it was drilled into me that British (imported from California) almonds are sad and flavourless things.That only Sicilian almonds truly taste of almonds.So ingrained is this now, that I go full on cyanide I’m afraid, so I would advise on tinkering until you get your preferred intensity and life expectancy.
Blanche 500g almonds (pour over boiling water, leave them to soak for ten minutes then slip them out of their brown skins).It’s a mindless job, but passes soon enough if you do it with the radio on or whilst chatting.
Rinse the almonds and then blitz them in a food processor.
Add them to one litre of water, with the juice of a lemon, a teaspoon of seriously good almond essence (bitter almonds if you can get it) and (if you like it) a cinnamon stick.
Leave everything to soak for 24 hours in the fridge, and then strain the milk.
(This can now just be drunk, like ambrosia, if the heat is really unbearable and you can’t wait for it to become an ice)
The Granita
Unite your jasmine syrup and your almond milk.
If you’ve done the full recipe – you’ll have two litres.
A granita should be scratchy and crunchy, so don’t put this into an ice cream maker – which will give you that refined sorbet.Instead, put the mix into a container, freeze it, and come back every now and then to aggressively fork it over.You want shards and crystals – you want the water to freeze and split and sharpen.
When it’s completely frozen and broken, it’s ready.Wait for a hot, hot morning.Serve it in your daintiest, campest glasses.Watch the clouds roll in and the heavens open.
This came from a birthday surprise and a challenge.
Last month, my locked down, low key birthday rolled around.Expectations were necessarily watered down.The plan had been to go to see the new James Bond at The Electric, and drink cocktails delivered to out seats.Instead I zoomed and made a cassatina.You can call this taking pleasure from the small things, or clutching at straws.Take your pick.
Then, like a foundling on the doorstep, a bag of bread flour turned up, a gift from my oldest friend.Wrapped in a translucent, blue plastic bag, it was the best present I had could have imagined,a thing of near mythic status, there, in my kitchen, promising me carbohydrates and joy.
It felt sinful to use, as though squandering a precious resource.I dithered about what to make.How to celebrate my new found wealth?
A suggestion was given, the enabler of my 2nd hand cook book obsession, thepastrysuffragette, invited me, perhaps challenged me is better, to turn my hand to a Torta Angelica – the angelic cake.He had seen my efforts in candying my allotment Angelica – and although not a component of the original recipe – the word play made it a natural fit, and not so far from the spirit of the thing as to be total blasphemy.
The recipe is in Pane e roba dolce, by Margerita Simili (Bread and sweet stuff, literally), it sounds and looks fiendishly complicated, but isn’t.This is a celebratory cake, so Christmas and birthdays, or just because.And it’s yeasted, so think panettone or brioche.And I have to say, it looks amazing, I was astounded that I managed to pull if off, first attempt, baking blind.
In the oven, it bloomed and blossomed, after the hours of cosseting, proving, rising, and plaiting I was rewarded by something wonderful, the size of a baby, golden and fluffy; the house filled with the incomparable scent of cooking, melting chocolate and those nibs of Angelica winked through the folds like emeralds.This was one of those bakes that make you clap with joy, and thank the gods for wonderful recipe writers, who guide you perfectly through uncharted territory.
Torta Angelica
Step 1
Make up a Biga.
This is a yeast culture used in Italian baking that adds more nuance to the the final bake, and opens up the texture.
80g bread flour
1 teaspoon sugar or honey
I teaspoon of dry yeast ( I used an osmatolerant yeast, another gift from Italianhomecooking – which is ideal for sweet breads, but given the state of yeast in the UK at the moment – use whatever you can get)
40ml water.
Mix this together as any dough, kneading for five minutes and then letting it prove for two hours.
Step 2
The sweet dough
220g Bread flour
1/2 teaspoon salt
120ml full fat milk (at room temperature)
2 large egg yolks (also at room temperature)
45g caster sugar
50g butter (at room temperature)
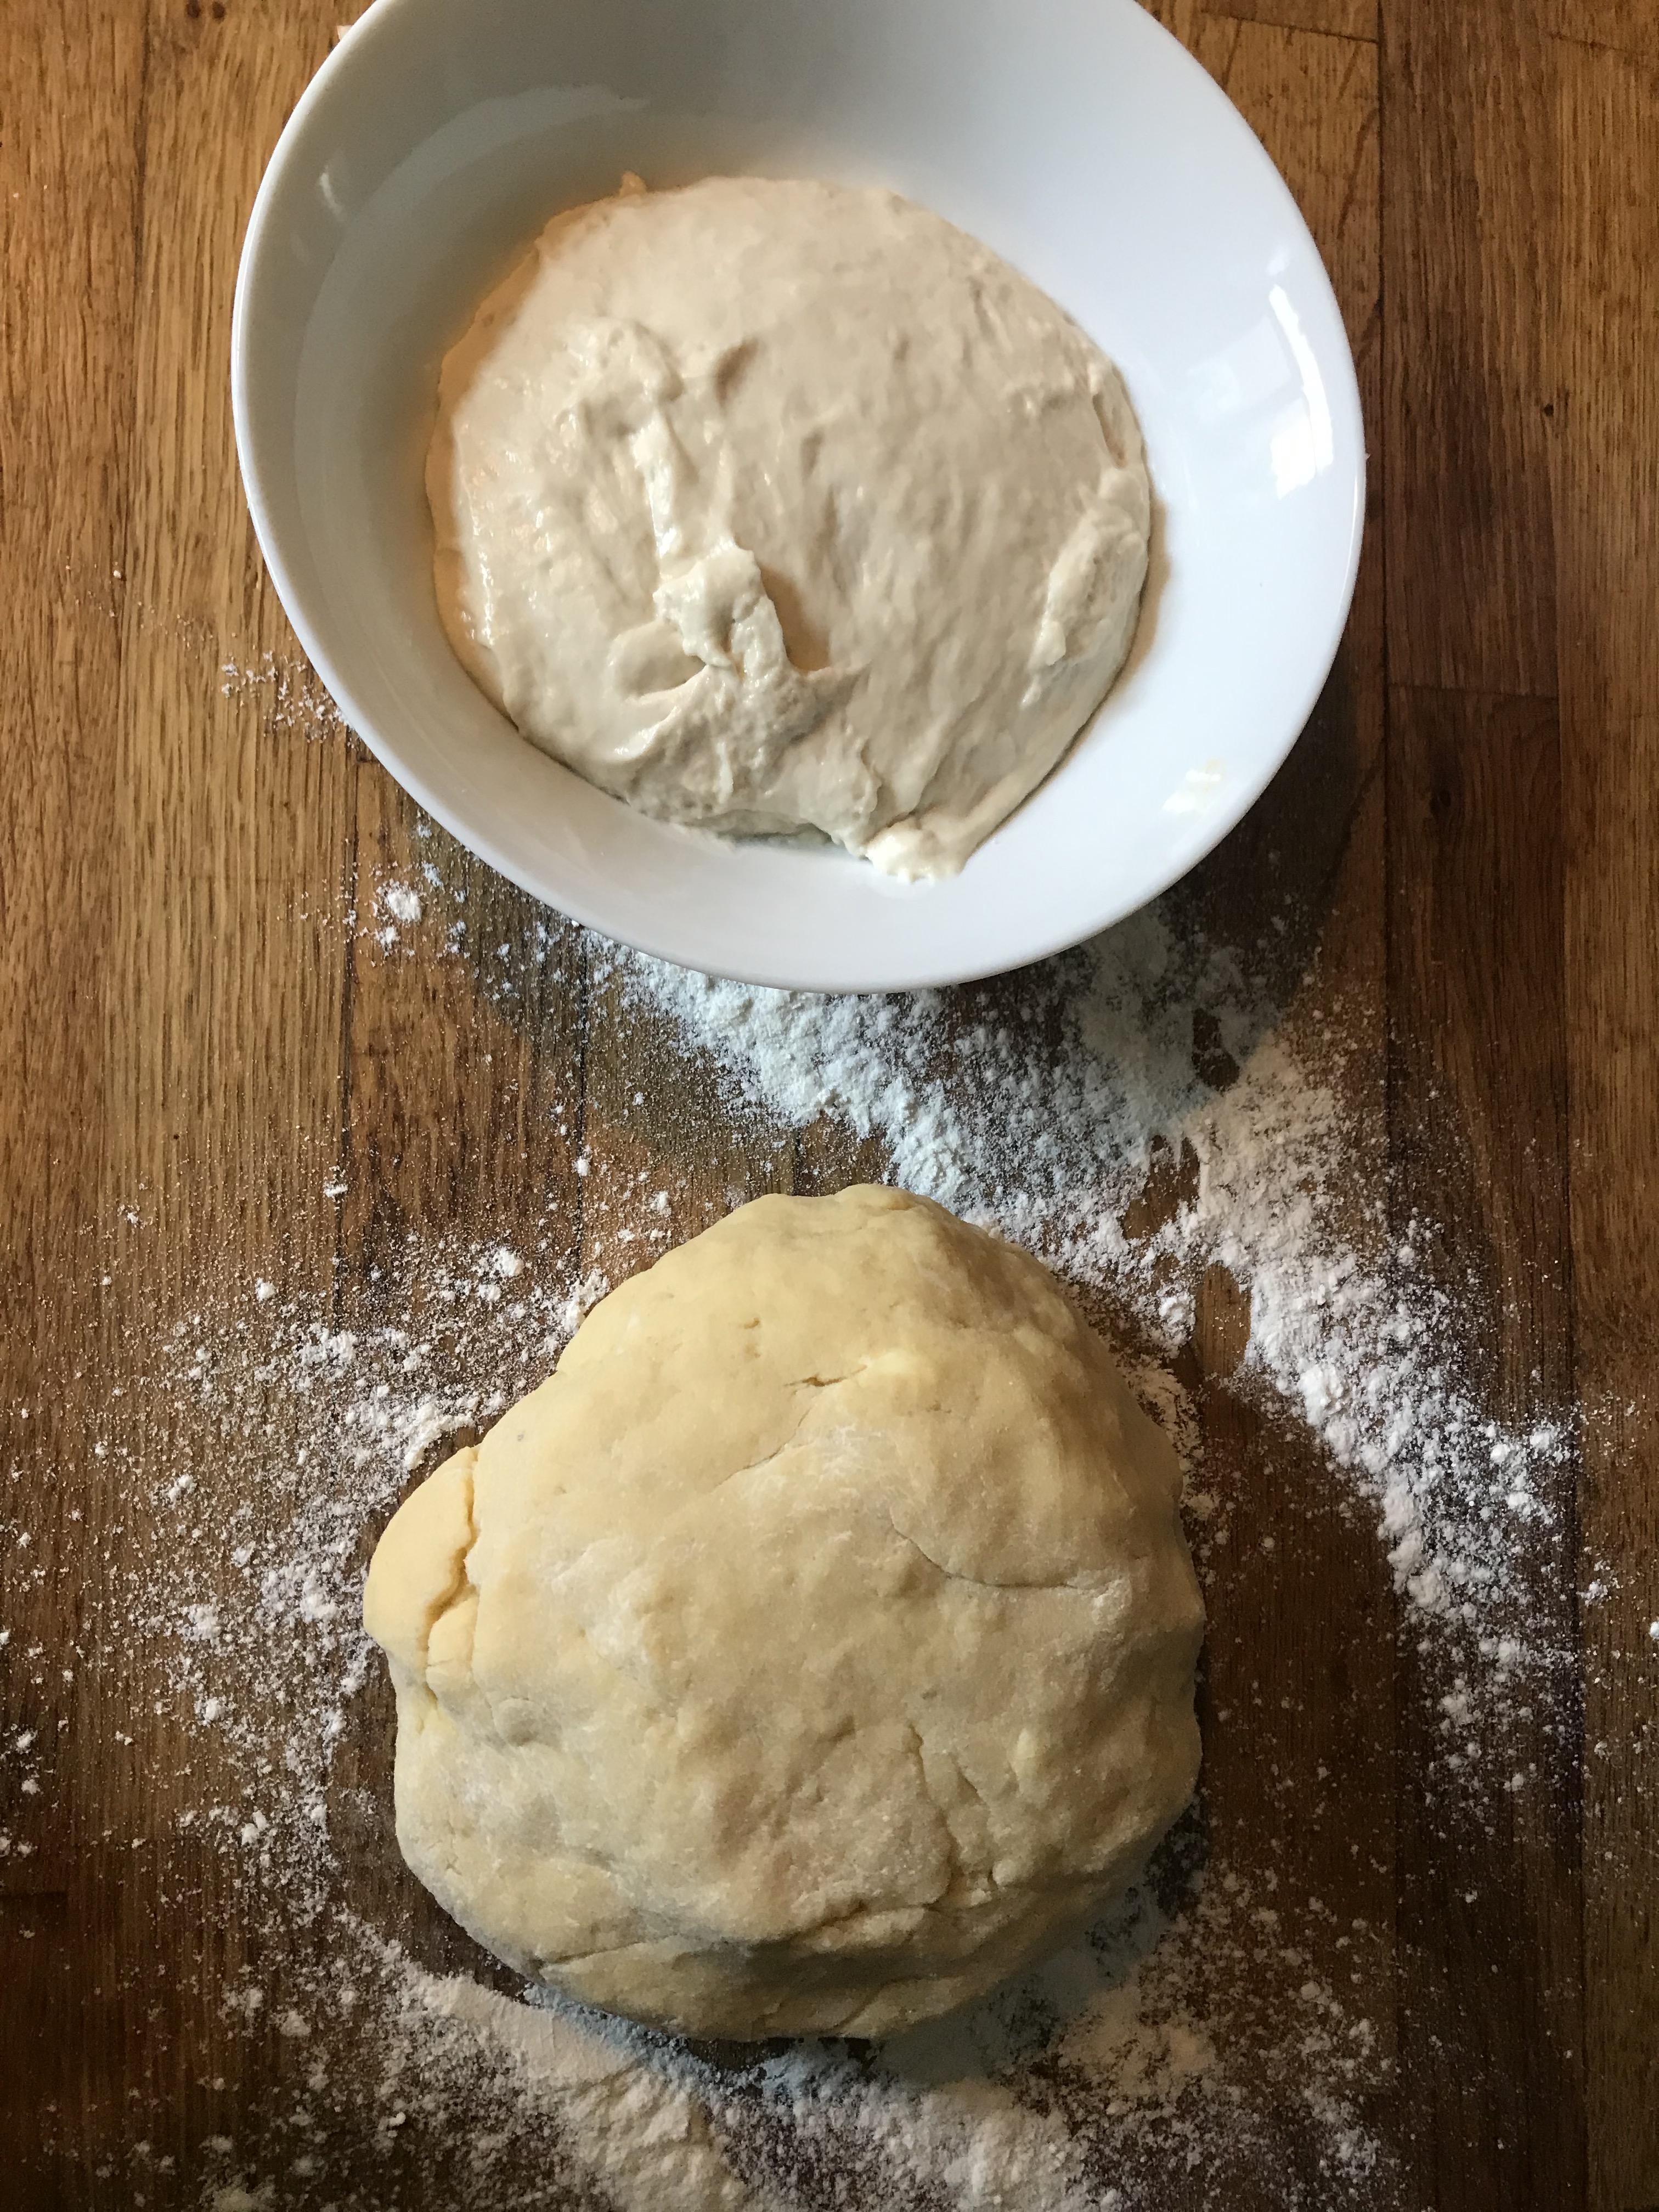
Mix all the ingredients except the butter (I used my food mixer with the dough hook attachment)
Once combined, add the butter, a little at a time.
Then repeat this process with your biga mix and knead everything for 5 minutes.
Cover the bowl with a damp cloth or cling film, and leave the dough to prove for 3 hours, until it has doubled in size.
Step 3
Assemble the Torta
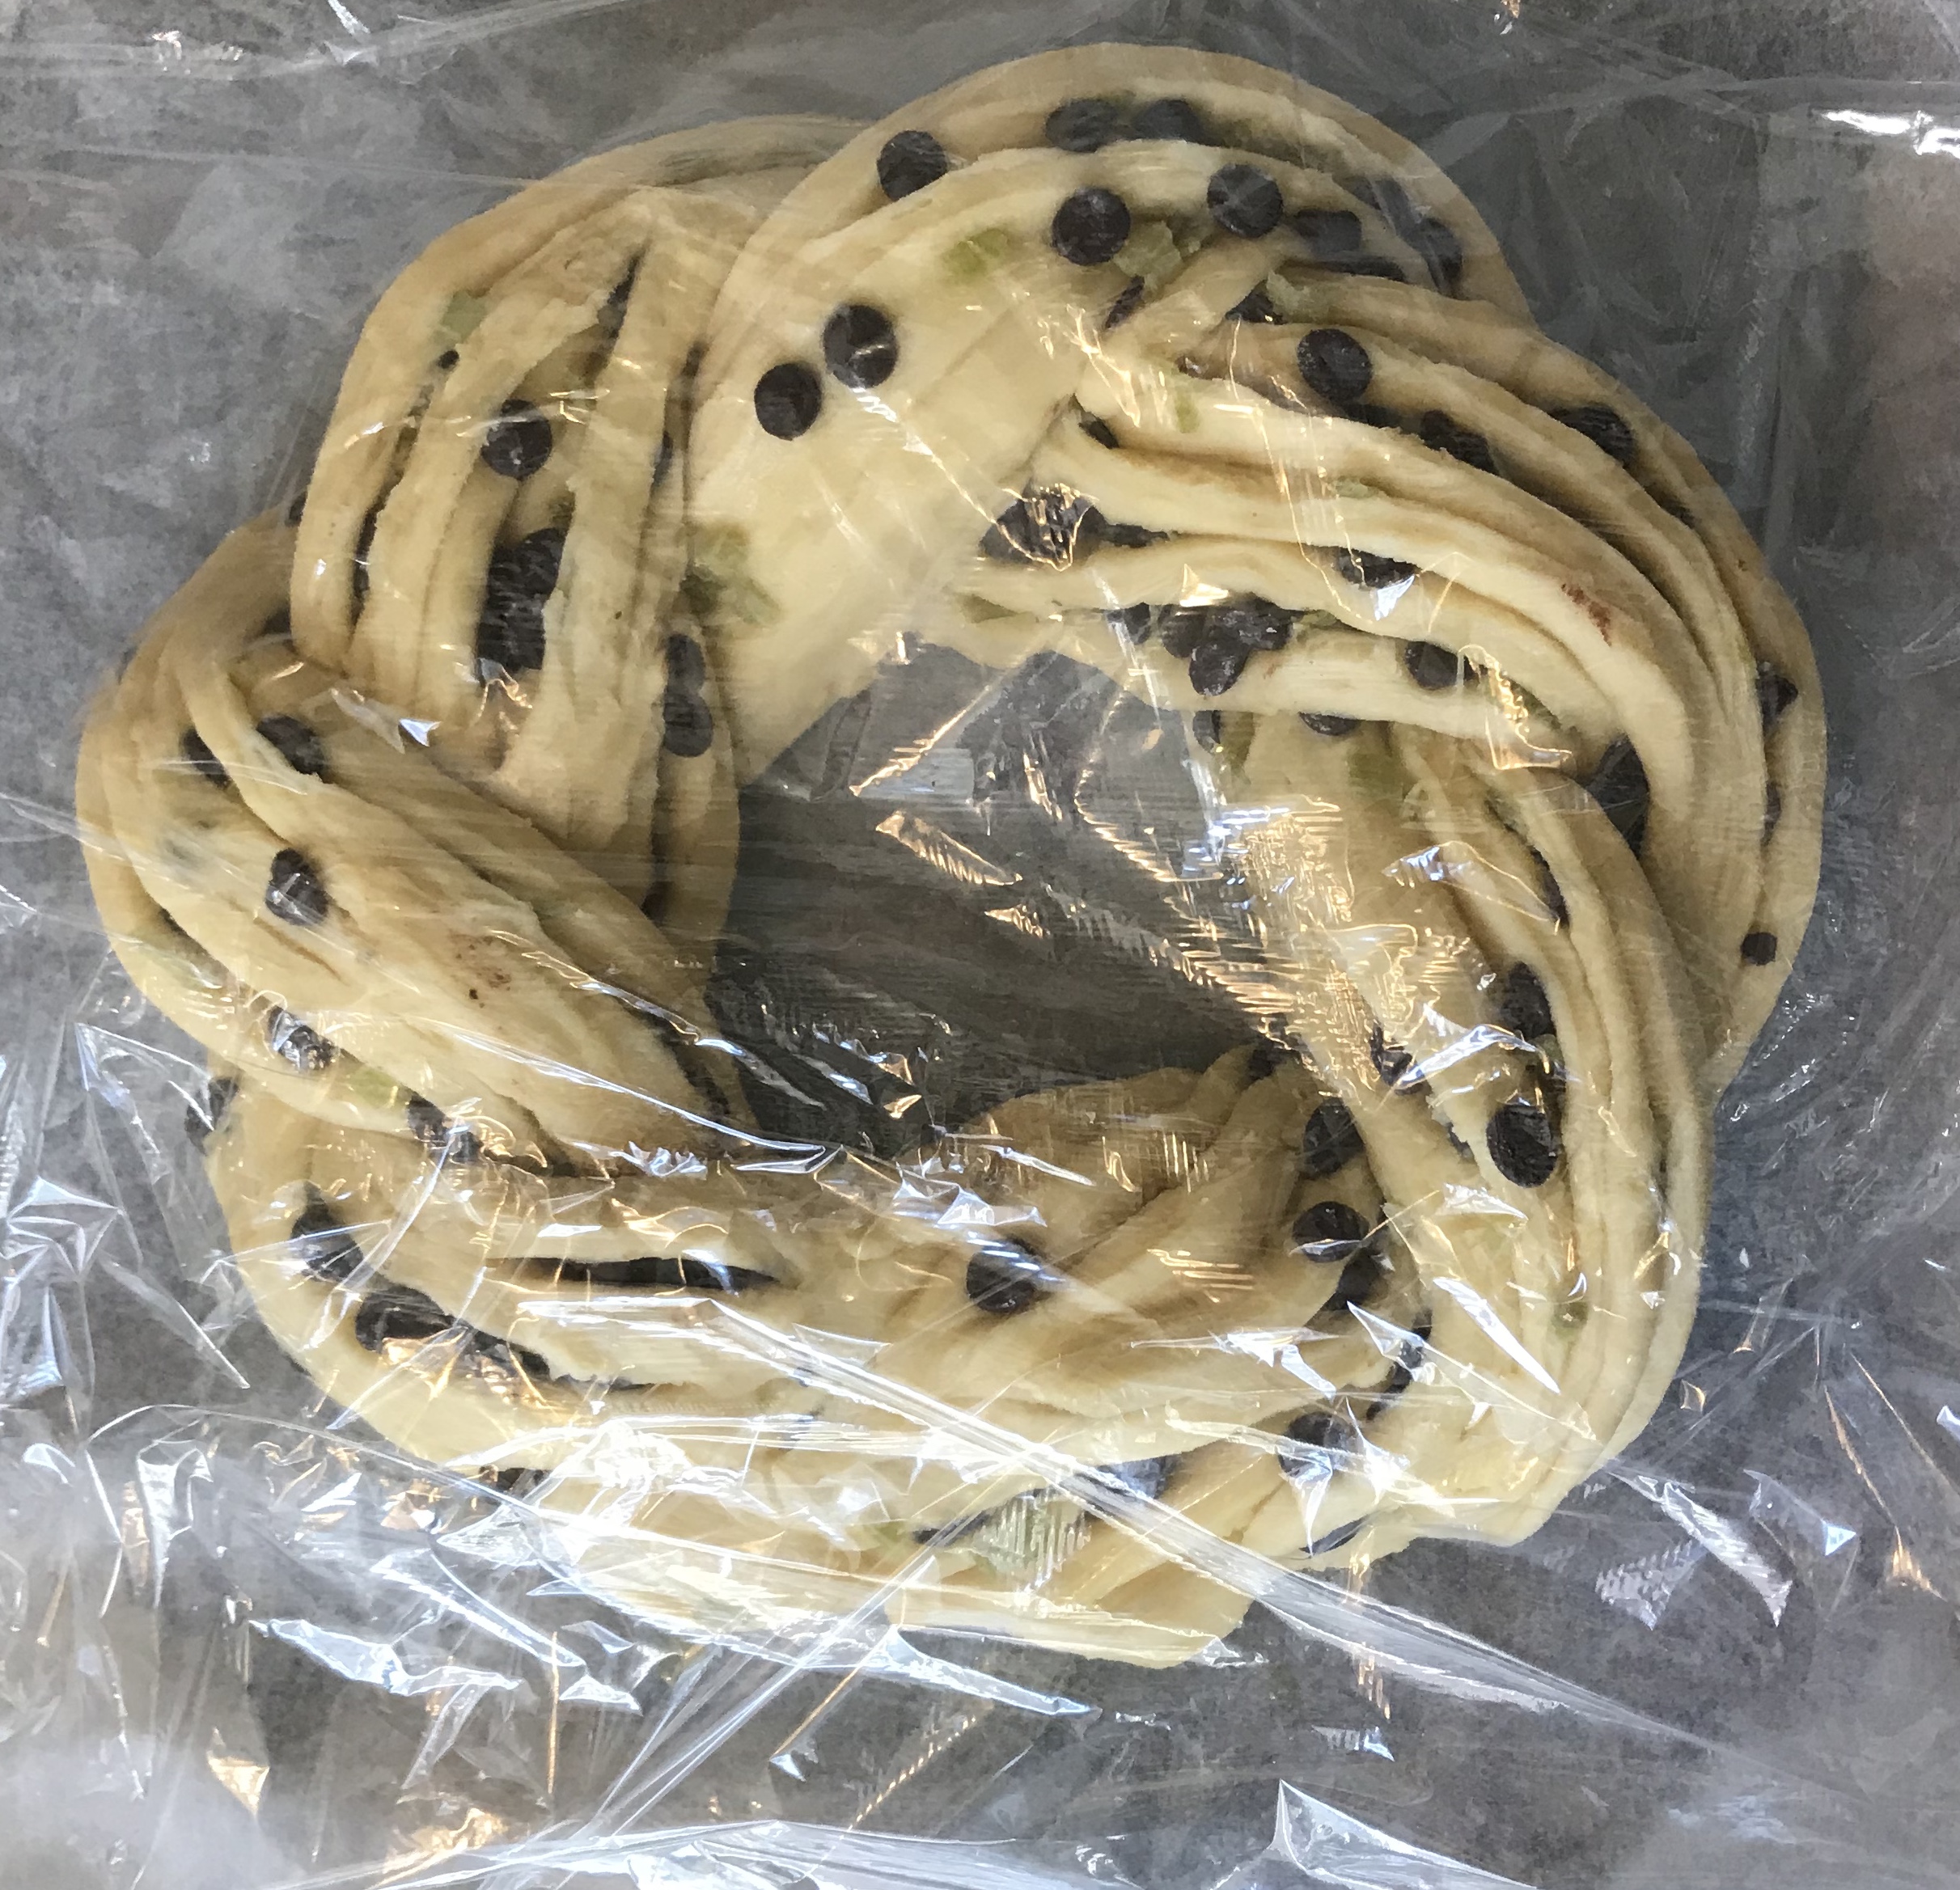
Turn out the dough onto a floured surface and roll it out into a rough rectangle shaped – approx 50cm x 30cm. Brush freely with 20g melted butter. And scatter over 120g chocolate chips (add Angelica if you like, or sultanas and chopped nuts.
Roll this up like a Swiss roll.
Then, with a sharp knife and a lot of confidence, slice the whole thing in half down its length.
You’ll have two layered strips now, which you plait together to form your braid, joining the ends together to form a circle.
Cover again, and leave this to prove again for at least an hour.
Bake in the oven at 180C / Gas mark 4 for 20-30 minutes – keep an eye on it, as the high sugar content may make it scorch (as mine did), so be prepared to add a tin foil hat half way through the bake, if you have a ‘hot’ oven.It will double in size – become a cake behemoth – don’t be alarmed, that’s your biga magic.
Whisk it out of the oven when it’s cooked (tap the base to see if it sounds hollow, and cool it on a rack.
I then made up a lemon icing (icing sugar, lemon juice) to drizzle over.This is just my preference, as I find plain icing too sweet, but you could also do a non lemon, vanilla flavoured drizzle.
The finished thing is massive – too much for one stay at home baker (half went to the next door neighbours).But save this recipe for more sociable days and give it a go.People will think you are a genius, which is never a bad thing.
You may have read my account of a weekend in Rome last October. The weather was apocalyptic, I had a full on head cold, but the day of artichokes at Latteria Studio learning so much from Carla Tomesi and Rachel Roddy, was an antidote to everything.A feast of knowledge and a bloody good lunch to boot.I have written at length and often about my unseemly love of artichokes, so I shall spare you a repeat here.
In some ways, it was a kind of a torture – spending that weekend surrounded by most loved vegetable flowers; everywhere I looked, they were on offer. And knowing that when I came back to Birmingham, it would be to an artichoke drought, broken only when (and as it turns out, if) I could get down to London’s markets, or when my young allotment plants decide to throw up their own flower buds (I’m still waiting for anything that you could tentatively call a ‘glut’).
I went to be shown a myriad ways to cook with artichokes, in the full knowledge that buying the quantities needed for some the recipes would bankrupt me, especially if I had to get them singly and cellophane wrapped from Sainsbury’s.
One dish in particular stuck in my food brain,niggling away with thoughts of “will I ever have this again?”Artichoke lasagna.A vegetarian layering of pasta, cheese and artichokes.Spanking hot and with a glass of teeth achingly cold white wine, this will be my death row meal (well, one of them).Whilst it’s a dish for winter and early spring in Rome, here, if you’re reliant on your own crop, it’ll be a summer treat.I have been missing this dish since October, dreaming of a day when I am rich enough to not care how many artichokes I have just bought, or somehow, have managed to persuade someone to give me gainful employment in Italy, so I can move there, just for the artichokes.
But then in the perverse way of the world, the UK want into lockdown, the panic buying stripped the shops, and bafflingly, this provided me with the wherewithal to finally break my lasagna fast.I was told of delitalia, an Italian catering supplier that a) had flour, a lot of flour and b) was now doing domestic deliveries to Birmingham. Of course there was a small catch, just a minor detail; you still had to place catering size orders.My cupboards and freezers are already overflowing with food from the allotment and ingredients I thought I ‘needed’ at some point.And it’s not that I’m a hoarder, just that I’ve always regarded Best Before dates as mere guidance for the wise.So, whilst the product list was temptingly extensive, I had to restrict myself to things that I really would use, and would buy anyway over the next year.Flour yes, I’m already a third of the way through it (and have turned into the go to ‘flour man’ for my isolating neighbours), oil yes – 5 litres of olive oil will see me through the next year.And then there they were, jumping out at me as though lit in neon; frozen artichokes, prepared and raring to go.Minimum order, 5kg.Yes, I am that much of an idiot.
A freezer drawer was cleared (I had to eat a lot of ice cream that week, a hardship) and now I havewhat should be a year’s worth of my favourite vegetable, but realistically, I don’t think they’ll see out lockdown.
As they arrived, my first artichoke flower formed on one of the allotment plants.This I prepped, battered and fried – I wanted to memorialise its perfection. It was literally a taster, for the main, the lasagna.
I urge you to find a way to make this (even if it means having to buy catering quantities of flour and olive oil).The version I ate in Rome was Rachel’s, and my memory of the details is not perfect.So when I get hold of the real thing, I may come back and do an update.The potatoes were an addition suggested by Italianhomecooking – and he is right, the additional texture brings another bauble to this dish.
As I write this, I am reheating the half I did not eat last night, for my lunch.There will be some bread too (I have to get through that flour after all) .It will be just as good second time round I know. All sweet anaesthetic on the tongue artichoke, cheese and carbs.Un buon pranzo.
Artichoke Lasagna
(This made enough for two large portions)
The recipe will get refined over time – as I was making this up as I went along.If you are lucky enough to have access to abundant and affordable fresh artichokes, substitute those for the frozen ones, prepped into quarters, as shown in the photos below.If using frozen ones, check them, some may still have a few tough petals attached, which can take all the fun out of them.
Artichokes
A cereal bowl’s worth of prepared artichoke hearts (defrosted)
One small onion, chopped.
1 garlic clove
Salt and pepper
Glug of white wine.
Oil
Put the oil into a large frying pan (which has a tight-fitting lid) and as it warms, add your artichokes, onion and crushed garlic, and once they start to fry, throw in the wine, quickly turning down the heat, and slipping the lid on.These need to cook until the hearts are tender and yield easily when stabbed with a knife.
Remove from the heat and blitz 2/3 of the artichokes into a puree with blender (check the seasoning), keep the remaining third whole.
Bechemel Sauce
Flour 25g
Butter 25g
Milk (I used 700ml)
Salt and pepper
Melt the butter, and then add the flour, cooking it, but not allowing it to brown.
Gently, very gently, add milk.A tiny bit at a time to begin with.
The starch in the flour will suck upon the milk and swell like something from a sci fi film.If you add too much milk, it’ll be impossible to get rid of any lumps.
When all the milk is absorbed and and you’ve beaten the flour paste into smooth submission, add a spot more milk. Repeat the process patiently, and you’ll end up up a smooth, glossy white sauce the consistency of expensive emulsion paint.Seaso again, this is vital, as this sauce, together with the ricotta, could make a bland filling if you’re not brave with the salt here.
The rest
Lasagna sheets (I used premade, dry, as I had some in the cupboard, left by a former lodger (the wonderful Simon, who named his son for me), but if you prefer to make your own fresh, go ahead).
3 floury potatoes (peeled, boiled and sliced)
Ricotta (one tub)
50-75g (or as much as you like) Parmesan or Pecorino if you can get it.
Assemble your Lasagna
In a deep pie dish, place a third of your potatoes, artichoke hearts, and the puree.To this add a third of the ricotta and grated parmesan. Pour over a quarter of the bechemel, season. Add a layer of lasagna sheets.
Repeat another layer of vegetables, cheese and sauce, top with more lasagna sheets.
One final layer, and then pour the last of the béchamel over the lasagna sheets.You can grate some more parmesan over this if you like.
Into the oven at gas mark 4, for 30-40 minutes, until it is bubbling and golden.Ideally some of the lasagna sheets will have started to curl and crisp up, for another layer of crunchy texture.
Eat straight from the oven, or reheat the next day (assuming you have leftovers).
I could write about strange days, and new norms.But I don’t want to.All the conflictions of guilt, gratitude, anxiety for the future, loneliness, community;there is nothing special or unique about my lockdown life.Nothing that deserves to be heard before other, more urgent stories.And there is an edginess, a tetchiness about, with short fuses and misunderstandings abounding.Food seems frivolous to some, writing about it almost provocative.So, as ever, I am in two minds.
But within this, there is some continuity.This is a food blog, it has always been a food blog.Its context and content may have shifted over time, as they will continue to do.But the food component is presumably why people read it, why those of you who follow me, subscribed for the updates.
So, tentatively, I stick with it, and it remains mostly about my journey, discovering Sicilian, and more widely, Italian food, one that’ll keep me on my toes for a few decades yet.
I am hampered in this journey by my woeful, state schooled, British ineptitude at languages (only the rich need to speak another language in the UK).Try as I might, Italian doesn’t sink in,despite the hours of lessons and practice.My ear doesn’t hear words, or even intonations, only white noise.Every day I practice with an app that asks me to translate strange phrases like ‘the ant is in the sugar’ (la formica è nello zucchero, if you’re interested), but the moment I’m asked a question in Italian, the vocabulary and grammar all drain away.The plan was to go and spend some time there, do an intensive course, only hearing and speaking Italian, to break that caught-in-the-headlights panic.Obviously, this plan is now on hold indefinitely.So other routes must be taken.
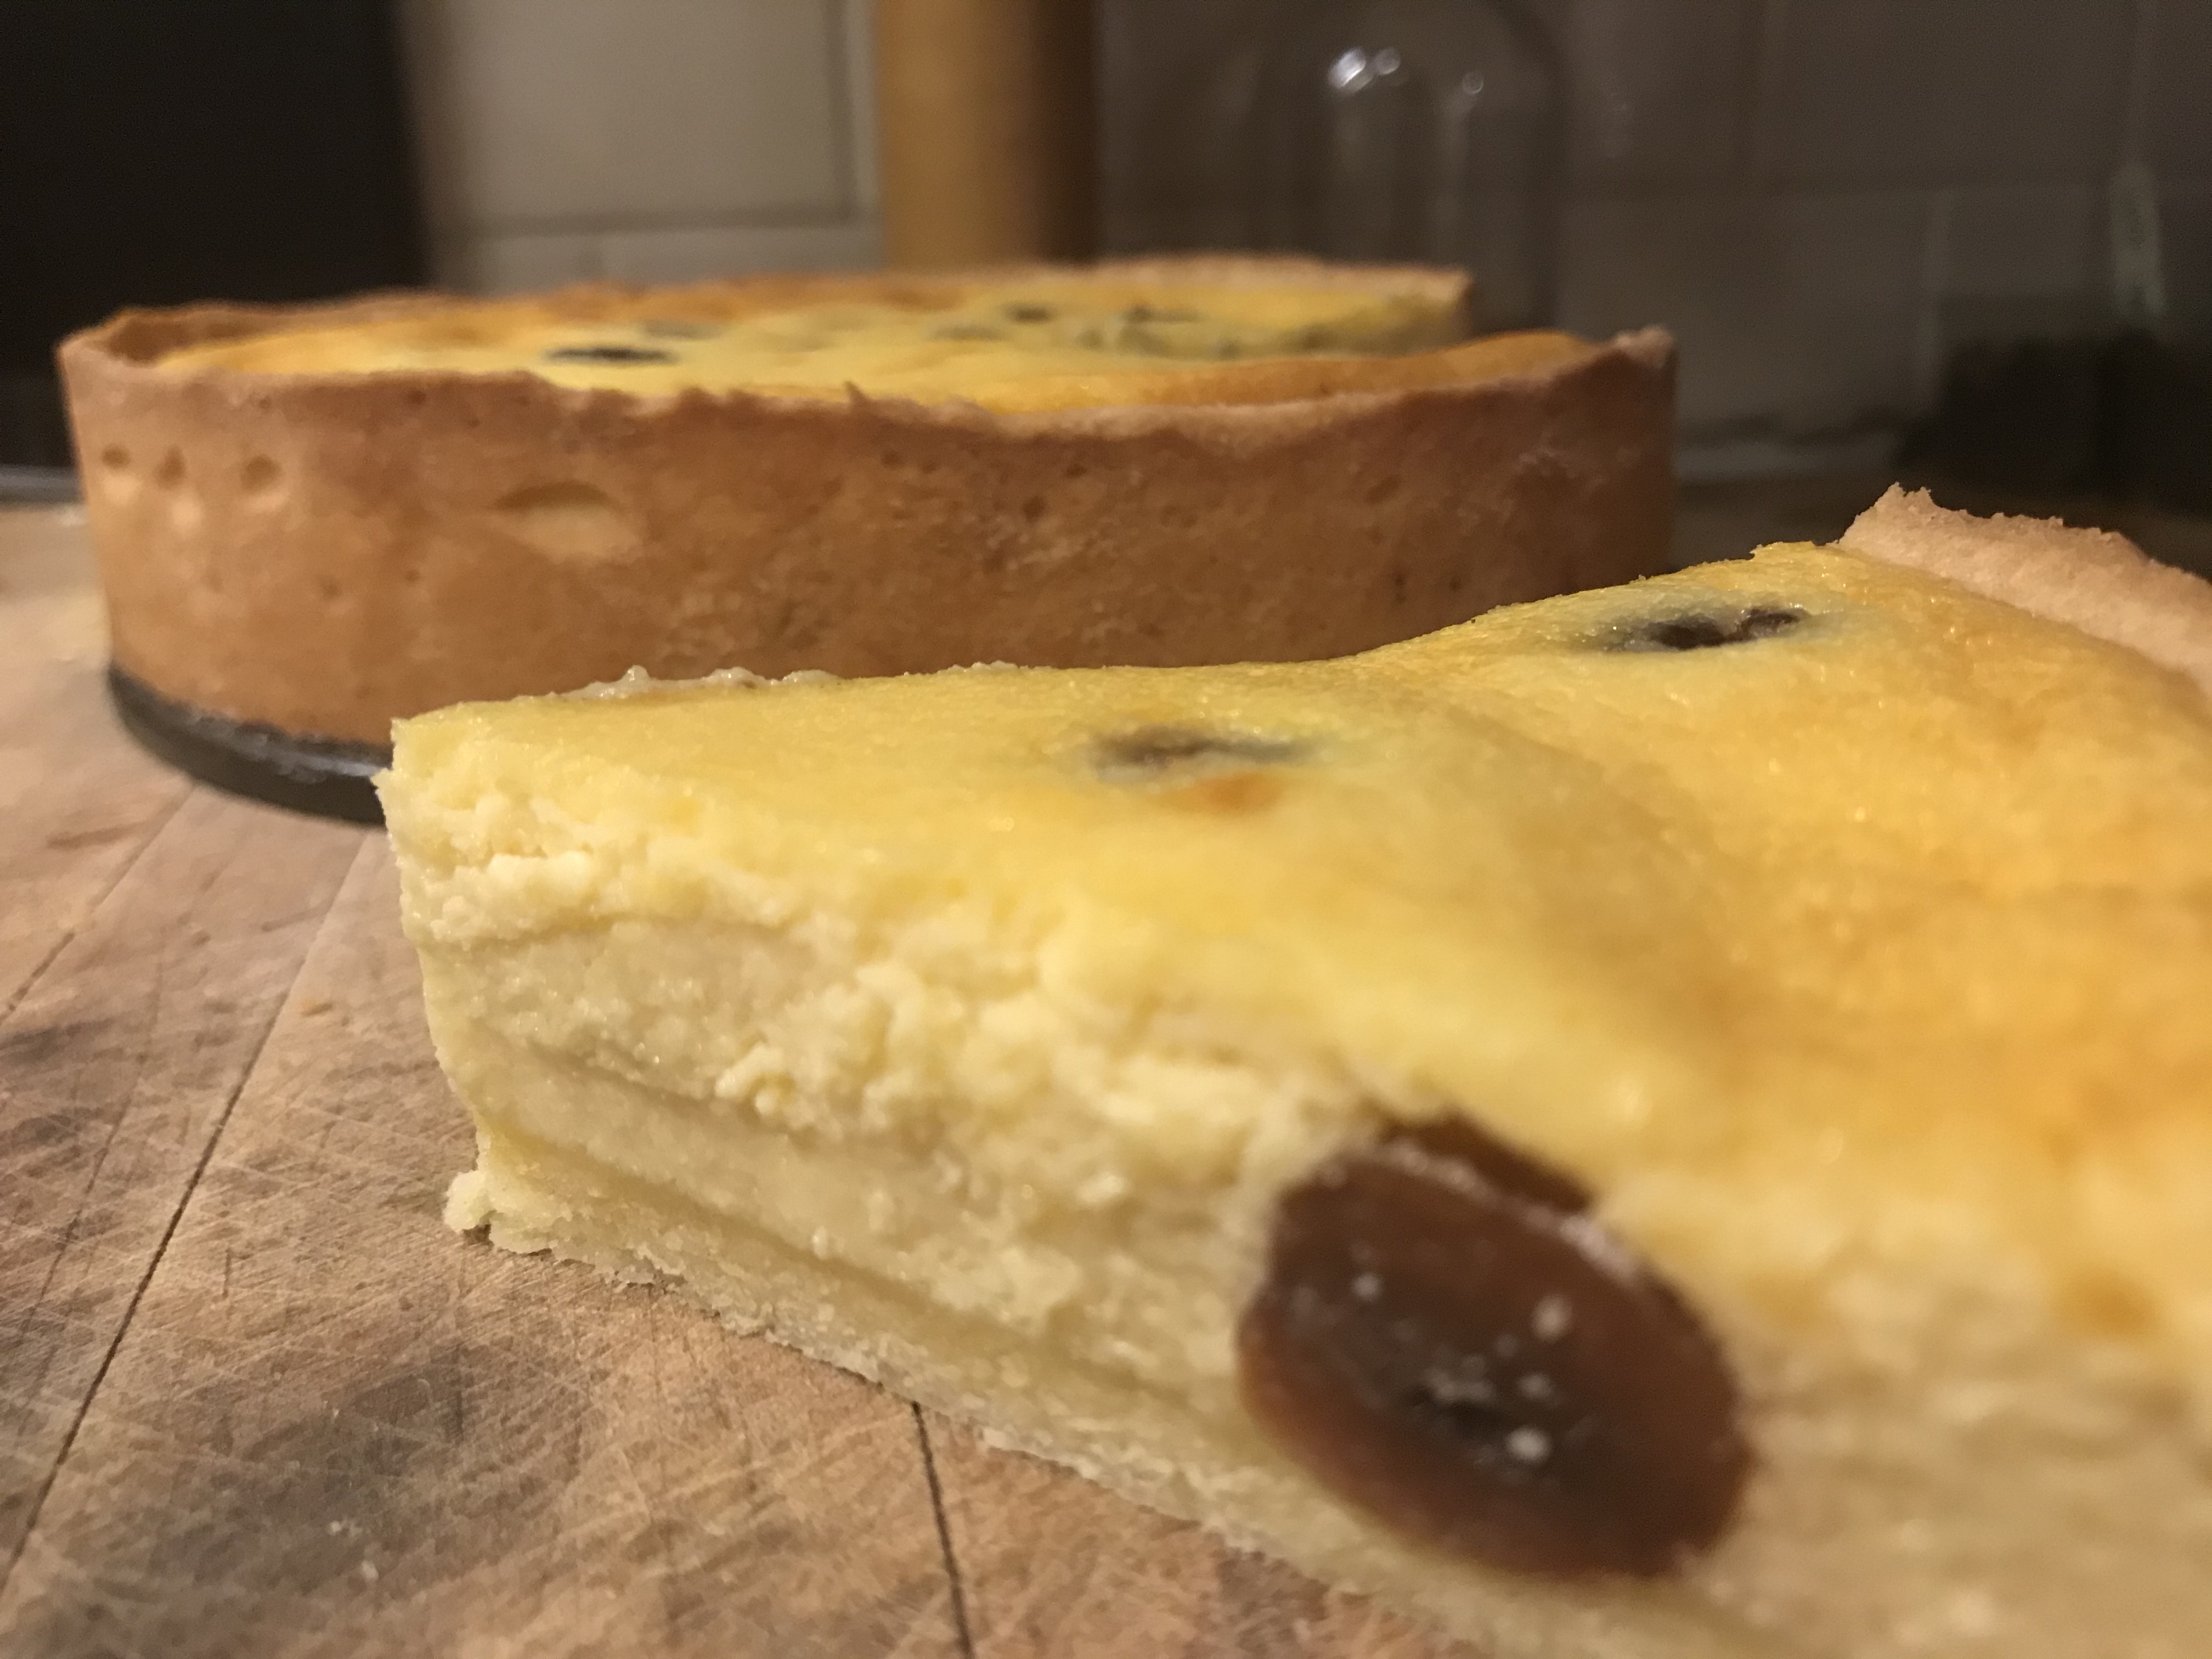
A friendship of cooks has established between myself and the much more knowledgeable and productive Italianhomecooking, who shares his knowledge freely, willingly, funnily, sometimes sternly.Butit’s great.He’s very good at suggesting avenues to explore, books to be read (or not read), the dos and the don’ts of Italian food.So I turn to him often for suggestions, and most recently he (having been told the contents of my fridge) challenged me to make a tart of ricotta and cherries, but, and there is a catch, I had to find Pellegrino Artusi’s 19th century recipe for pastry, la pasta frolla, in Italian, translate it, and then make it as the case for my tart.
Pellegrino Artusi literally wrote the book on Italian food.Just a few years after unification, ‘Science in the kitchen and the art of eating well’, was the first publication that attempted to cover the diversity of this new nation’s food culture.This was 1871, and my Italian is not even up to 2020 standards, let alone 19th century ones.But I discoverthat he had three recipes for sweet pastry – two containing lard, all with illicit amounts of butter and sugar.There is some talk of not working the dough too much because of the risk of burning (I check, confused, but this is a saying, if not an actual thing), of using the knife, egg washing the crossed lattice on the finished tart.So I think I have it, it takes a while, and I learn a new word (tuorlo, for yolk), and I think I am ready to start my tart.
The pastry, even after chilling, is dangerously unwieldy, I have to use profligate amounts of flour to stop it sticking to everything, but I get there.My cake tin is lined, with an eggily golden case of impressively smooth pasta frolla (the secret is to use icing, not caster sugar).
Into it goes a batter of ricotta, sugar, eggs, and then, like a clafoutis, two big helpings of boozy cherries, hauled out of their embalming fluid.
It’s the first time I’ve cooked a sweet ricotta tart, so I’m very much guessing on the timings.I watched it hawk like – at the moment that there was a hint of golden, and the wobble of the eggy ricotta was about to set firm, I whisked it out of the oven, guessing it would continue to cook under its own steam for a few more minutes.
My tart, which would have been a crostata if I’d applied Artusi’s egg-washed lattice on top, was, I am happy to say, fantastic. Sweet, tangy, and, yes, tart from the resurrected cherries.The pasta frolla was perfection.I have never had much luck with sweet pastries, they’re always a bugger to work with, and don’t take well to blind baking, tending to slump into a sulky pastry car crash.But this was intact (supported by its ricotta interior), golden, crisp – as though someone else, not me, had made it.Old recipes needing translation, are not something I would usually embrace.There’s very little in Mrs Beeton that I would want to cook, and if I had to translate them first, I would have even little faith.But, it turns out, this Artusi knew his pasta frolla.This will be my go to tart pastry from now on.I’ve bought Science in the Kitchen based on this one recipe, although admittedly, the English translation…for now, let’s not carried away.
Ricotta and Cherry Tart (Torta di ricotta e ciliegia)
Artusi’s pasta frolla (the one without the lard)
250g plain white flour
125g cold butter
110g sugar (ideally icing)
1 whole egg
1 egg yolk.
Cut the butter into small cubes and work it quickly into the flour.Starting using a knife, then with your fingers.Is it just a British saying about the best pastry chefs having cold hands?
Mix in the sugar
Add the beaten egg and yolk, and with the knife again, mix everything together, before forming the dough into a ball.
Wrap this up and put the dough into the fridge for at least an hour – but next day is even better I’m told.
Turn the oven on, Gas Mark 4, 180 degrees C to preheat. (ok, on reflection, this is either too hot or the timing is too long. A gentler bake is required, that’ll set the filling but barely colour the pastry at all – best adapt for your own oven).
Ricotta and cherry filling.
500g ricotta
50g sugar
2 medium eggs (large ones may make the mixture too sloppy, and if you want to make a lattice top, the cheese won’t be able to support the weight.
75g Cherries (ideally, preserved in alcohol of some description and drained), or you could poach fresh cherries, or use tinned ones.
Mix the sugar, eggs and ricotta to a smooth batter.
Assembling the tart.
Roll out three quarters of your chilled pastry dough on a very well floured surface.As soon as it starts to warm up, it will become sticky, so, the flour is essential.You want it to be roughly 3mm thick.
Use the pastry to line a 22cm Victoria sponge tin, that you’ve greased with some butter, then trim any overhang.
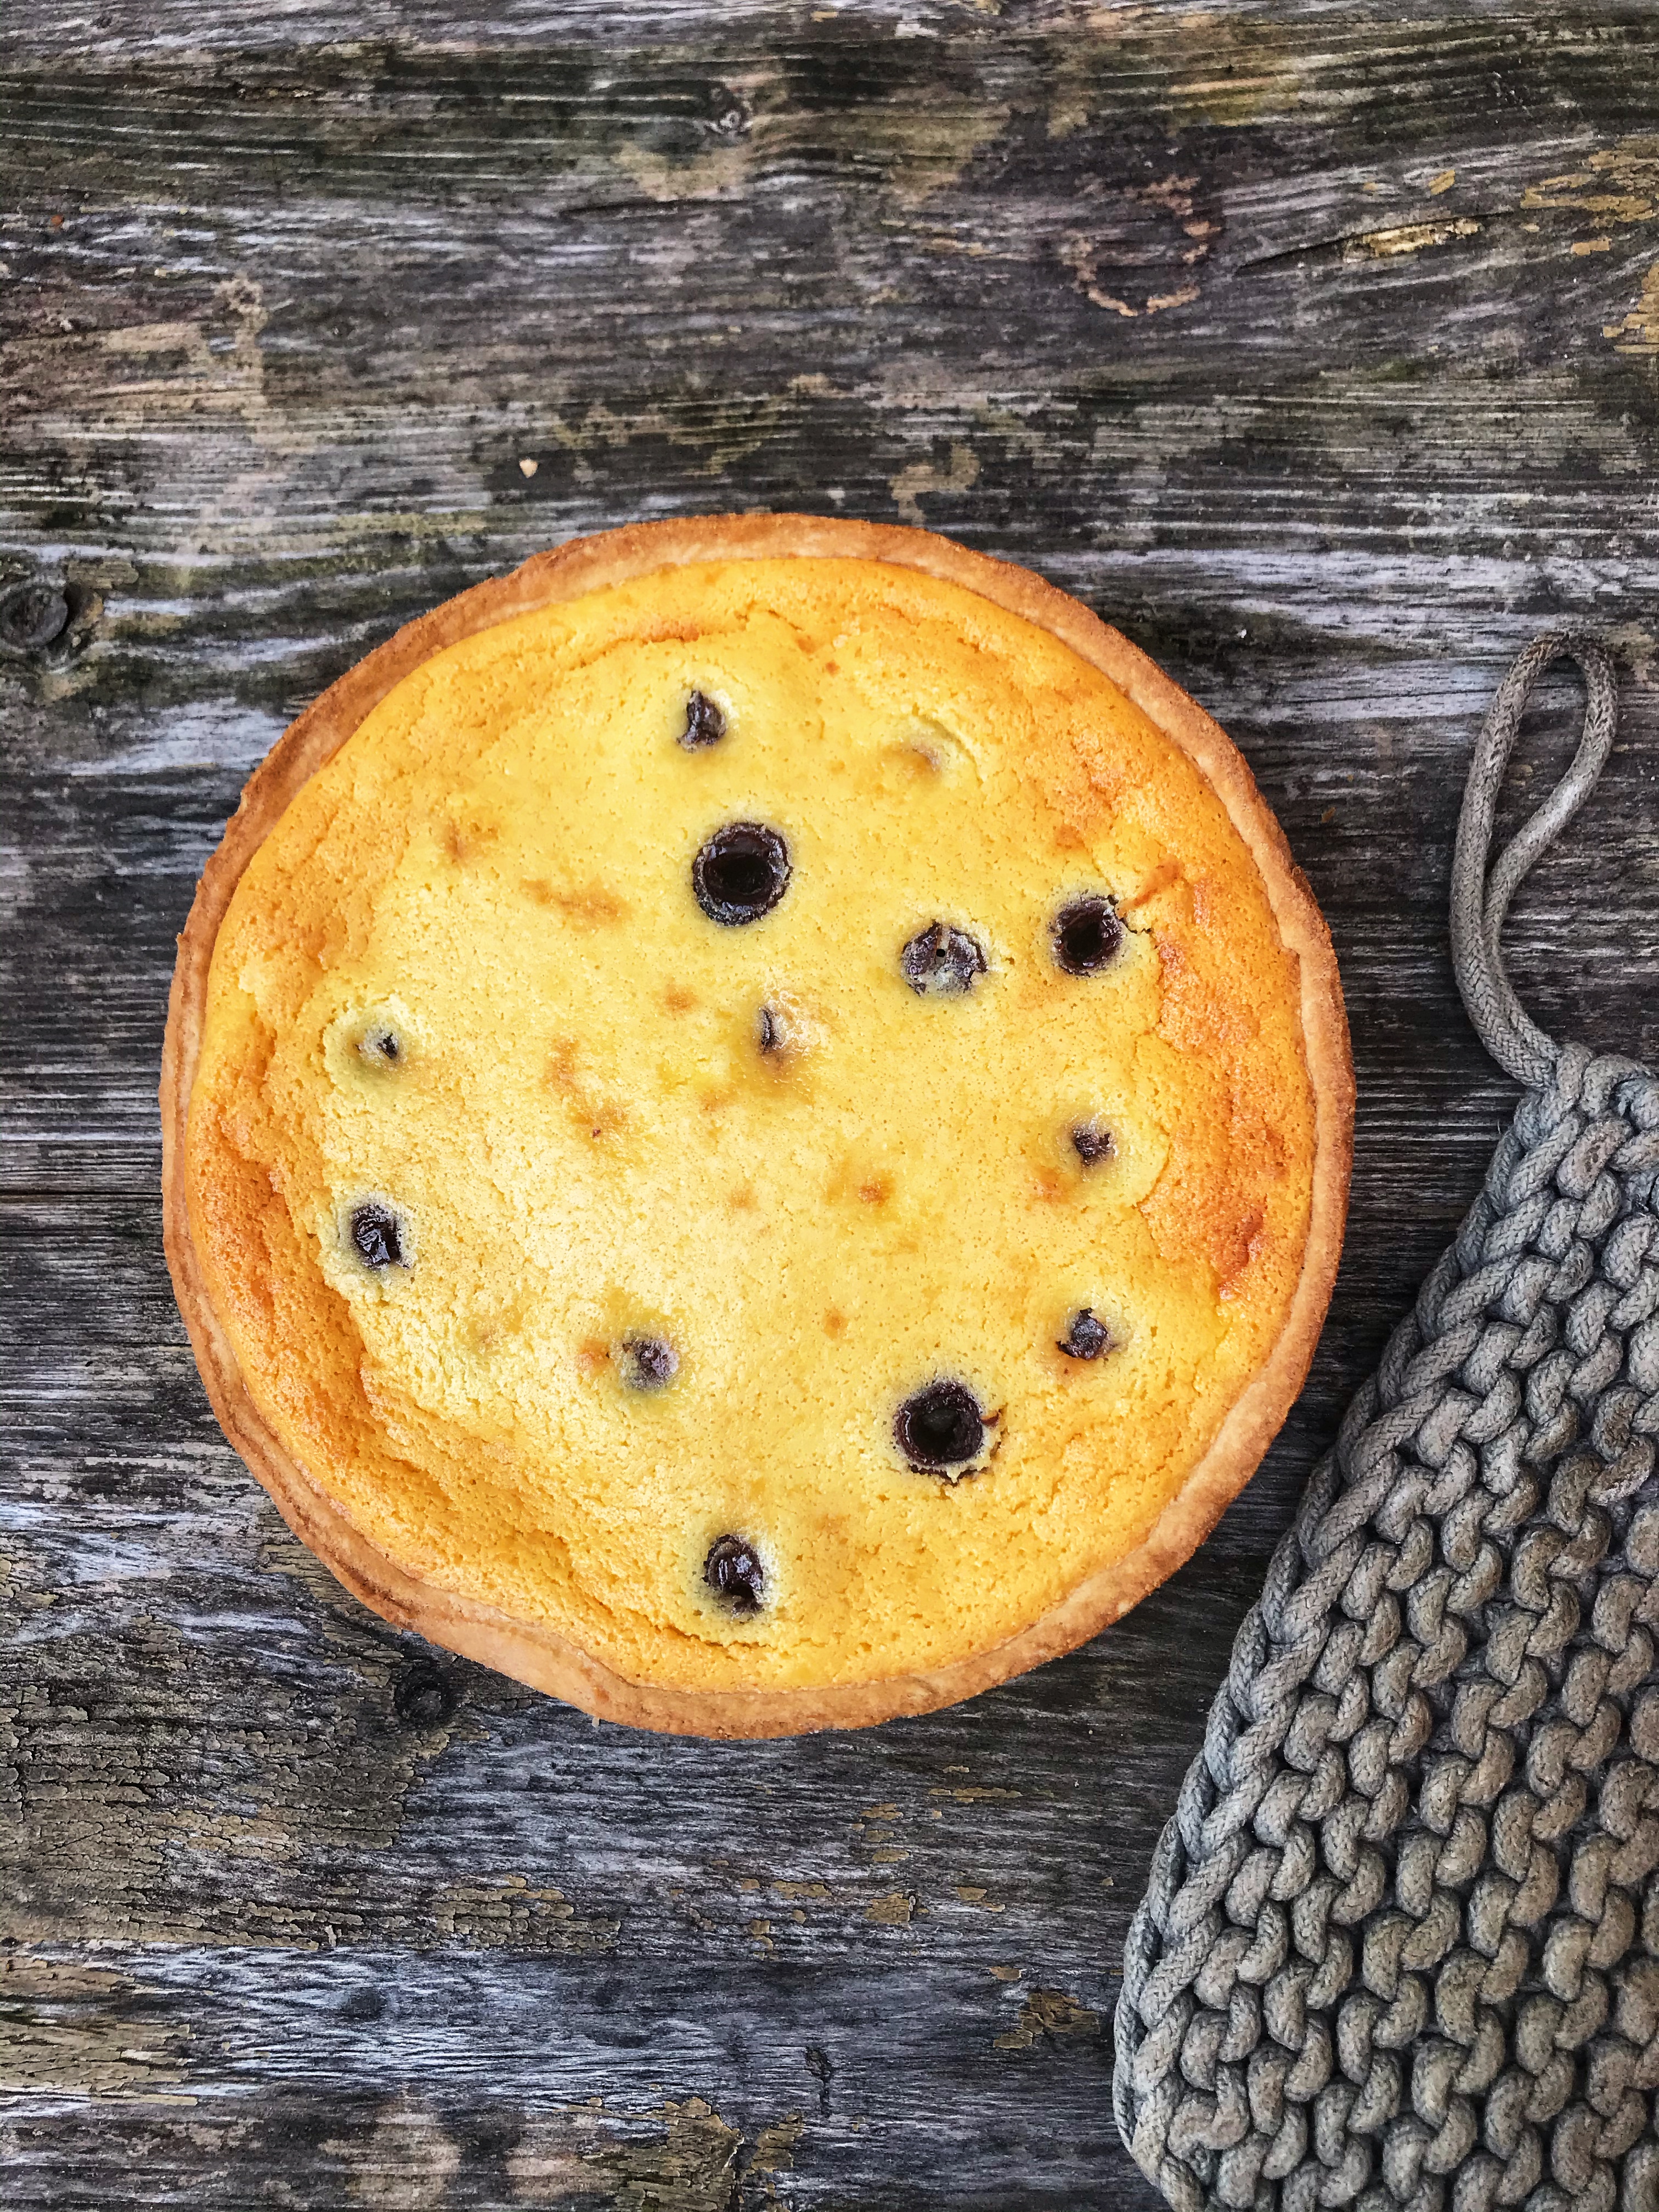
Put the tin on sturdy baking tray, and then pour in your ricotta batter, before scattering in your cherries.75g is a guideline, just keep going until the batter has filled the pastry case.
Now you have two choices:
bake it as is.A British tart with Italian touches
Use the remaining pastry, roll out then cut strips of 1-2 cms, but try to keep them all the same width.Then use these to form a criss cross pattern on topof your tart.Brush this with a beaten egg, and you now have a very Italianate Crostata.
Both versions go into the oven for anywhere between 45 minutes to an hour (my newish oven I am learning is very casual about sticking to the Gas Mark it’s set to, so everything always takes longer than the recipe says).
When the wobble has almost stopped, your tart is done.